Dear readers!
If you follow my blog regularly, I’m sure you must have noticed I complained about my own eyelashes many times. They are thin, straight, and quite sparse. Unfortunately, the effects of years of lash extensions are noticeable now. I decided to give Nanolash Lash Lift Kit a chance. It ensures I can perform a lash lift at home. Did it work for me?
My eyelashes – what did I want to change about them?
As I mentioned, my eyelashes were my biggest complex. They did not look the way I wanted. First of all, I am aware that I am responsible for the damage. I wore extensions for many years and rarely took a break.
Virtually every day, I used an eyelash curler and applied extra coats of mascara. I knew that this would put extra stress on my lashes, but how could I go out, even for a simple walk, when my lashes were practically invisible? Well, that’s right, it’s impossible.
At some point, I decided that my lashes needed proper restoration and a complete makeover. I have to admit that curling them with an eyelash curler every day was also taking up too much time, and investing in more and more mascaras that didn’t work was taking up most of my paycheck.
I came across Nanolash Lash Lift Kit online. The producer declared that it ensures results that last up to 8 weeks, and the products additionally rebuild eyelashes. I guess you can understand that I just had to check it out!
What does the lash lift and lamination kit from Nanolash consist of?

Nanolash Lash Lift Kit received a lot of positive reviews online. The users talk about it in only superlatives. I ordered mine directly from the manufacturer’s website. The package arrived very quickly and from the beginning, I liked the aesthetic packaging.
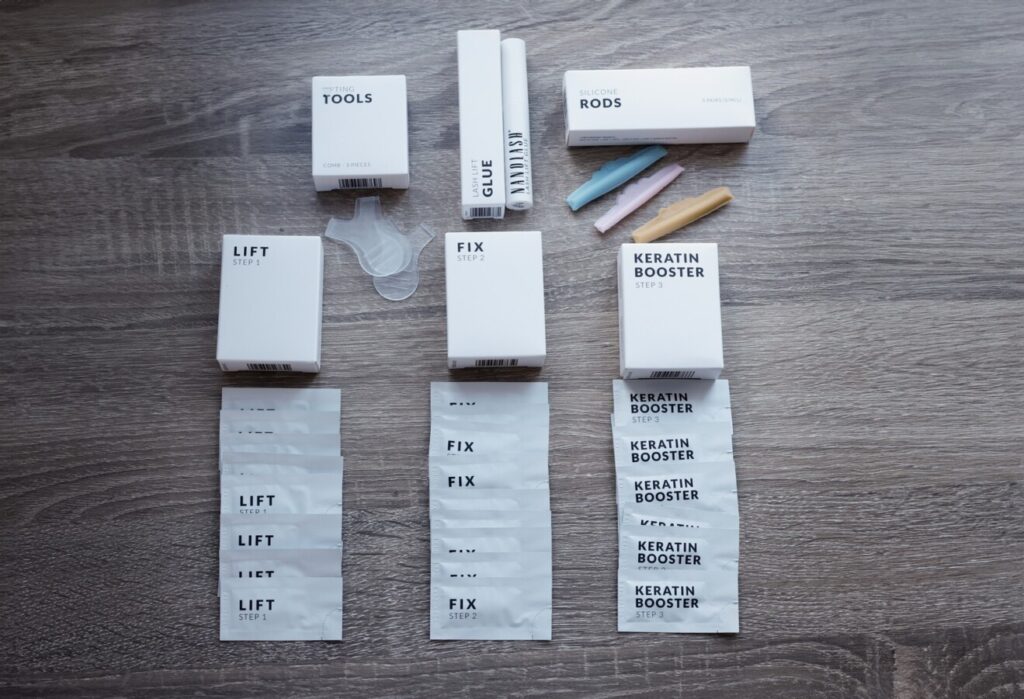
In the box, I found:
- 3 eyelash-laminating formulations labeled as: Lift – Step 1, Fix – Step 2, and Keratin Booster – Step 3;
- 3 pairs of silicone rods in sizes S, M, and L;
- Lash Lift Glue for attaching the rods;
- other accessories for laminating eyelashes at home.
I will also mention that the products are available in sachets. The box includes:
- 30 sachets, 10 of each formula;
- each of them comes in a 0.5 milliliter sachet.
You don’t have to be a maths champion to see that one lash lift kit will allow you to perform 10 treatments without leaving home.
Another aspect that’s important for me is the formula of the products themselves. Natural ingredients like grape seed oil and avocado oil are listed on the labels. They penetrate deep into the structure of the eyelashes and nourish them.
My first DIY eyelash lift with Nanolash!
Shortly after unboxing Nanolash Lash Lift Kit, I started preparing for the treatment. I started by cleaning my eyelashes.
TIP
As I was doing the eyelash lamination at home by myself, I divided the process into 2 stages and performed the treatment on each eye separately.
Following cleansing my lashes, I separated the top and bottom ones and got down to attaching the rod. Using the included Lash Lift Glue, it went smoothly. The sachets have numbers indicating the order of application, so I followed that. I started by applying the first product:
- I combed the lashes upward so that they would stick to the rod and left the product on for 10 minutes, then I washed it off;
- I repeated the same procedure with the second and third products;
- I gently removed the silicone rod.
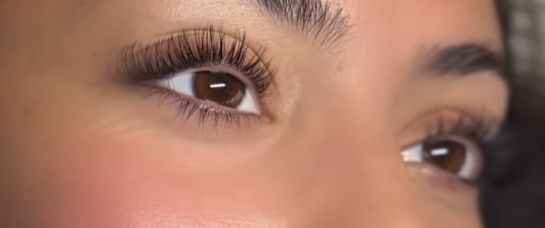
The effect exceeded my expectations! My lashes became defined, curled, and visibly thicker. Their resilience also improved. I ditched my eyelash curler completely and applied only a single coat of mascara. It was sufficient.

The effects, according to the producer’s claims, lasted 8 weeks, and I am looking forward to repeating the treatment!
In a word, I highly recommend you to laminate your lashes at home. The lash lift and lamination kit from Nanolash makes the whole process quick and efficient, and the results are spectacular.


Leave a Reply